
Back then when I was writing my review of the Deep Sea Creatures (31088) set I was quite enthused as you may have noticed, yet something was missing that I would have considered essential – an octopus model. This compelled me to actually sit down and create one of my own. That may sound simple and obvious, but of course there’s a specific twist to the whole story, so allow me to tell you a bit about the thoughts and design process behind this project.
The Objective(s)
Before I even started to actually construct the model I knew how I wanted it to look and feel eventually. How to get there was a different story entirely, so I had to establish a few rules and parameters.

Size Comparison with the original Squid from the Deep Sea Creatures (31088) set
The scale should match the generalized “squid” model one can build with one of those sets. This would not only reduce parts count to something sensible, but also keep things manageable since I wanted to include tentacles with a realistic length and on top of it all eight of them as you would find them in nature. Ideally I also wanted them to act and look naturally with some tapering and possibly also the “wings”/ skin webs between them at least hinted at.
It also set up a nice challenge in that it would require some strategic thinking to capture the shape of the creature, build a robust and stable model and still keep it poseable. If you get my meaning – building a large model and getting a good approximation even of complex surface curvatures is easier, but the real crunch comes when you have to express them with a limited number of pieces crammed into a small space.
The model itself should be based on the four sets I ultimately had bought as much as possible, meaning it should use the parts contained therein without having to throw in too many extra parts. This would save cost and avoid too many leftover bits clogging up drawers and storage boxes. Resorting to some additional parts from my collection should be kept to a sensible minimum, though I was aware that I possibly could not avoid it entirely. Some elements I planned on using are just not part of the original set.
The two factors combined resulted in a third prerequisite presenting itself: The overall parts count would and should be in a region that equals that of a commercial mid-range set, i.e. the accrued cost should ideally not exceed the combined value of the initial four sets plus some minor spending for the extra parts. Reigning in the cost would make it feasible to create instructions for the model and publish them so others could possibly re-create it without going broke in the process.
Time for some Action…
Building the model took quite some time. I’m a slow builder who likes to take his time to properly check and evaluate each step to begin with and naturally, getting the most out of limited resources presented its own challenges, given that my parts repository isn’t endless and even small changes can cause delays if you don’t have the right piece on hand and have to wait for that Bricklink order to arrive. I’m also a bit obsessive about making things stable and unbreakable, requiring even more thought to go into how you attach individual elements so they don’t fall off easily.

Head in resting Position

Head in swimming Position
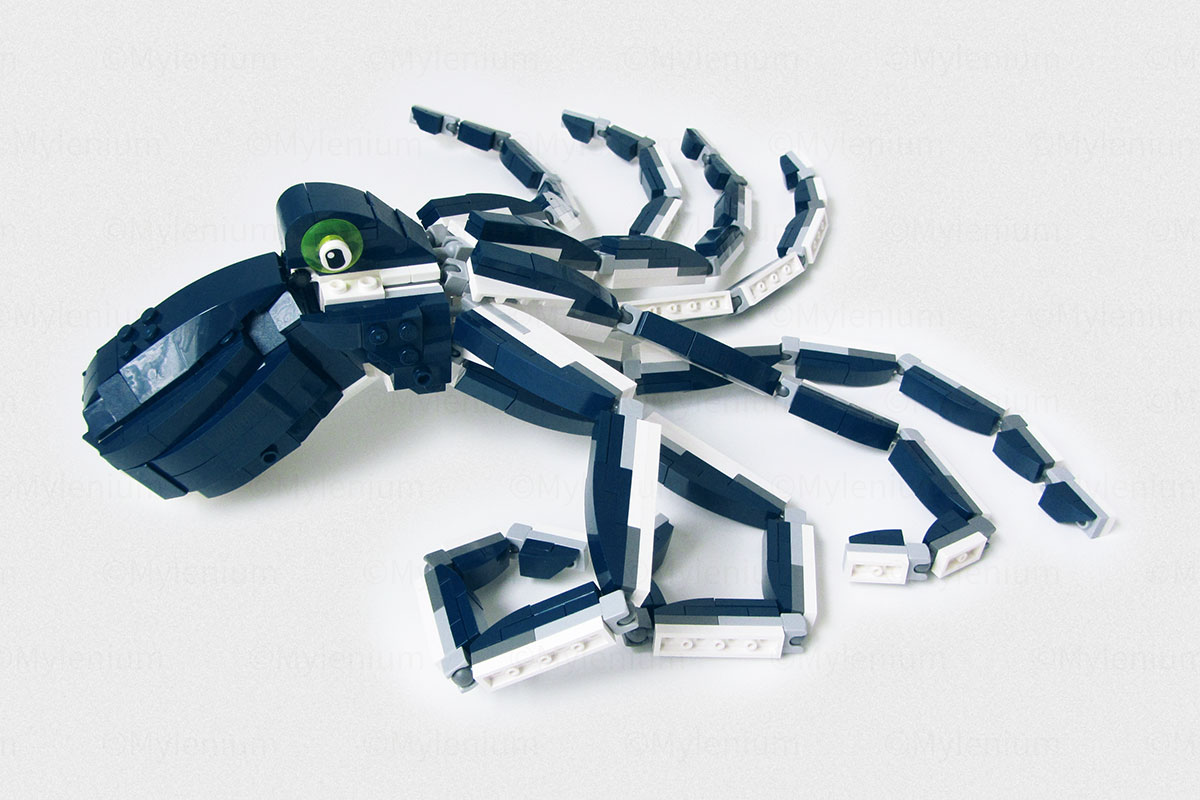
Given those circumstances and my self-imposed rules I started out with the main part of the head, the mantle. Visually it is the largest body region on most octopus species due to it being more or less a big hollow sack inflated by water inside. Naturally the main purpose is to provide jet-like propulsion when said water is pressed out through the siphons, but the mantle also plays an important role during mating rituals or in its deflated form for camouflage when the octopus is resting. Incidentally it also looks like a big bulbous nose, which in not so minor parts is one of the reasons I think octopuses are cute. Getting this right therefore was important to me.
The tricky part for this section of the body was squeezing in all those elements necessary for the perpendicular building, so the various slopes could be attached to the sides, front and top. The problem here is not so much that it would be impossible overall, but rather that you have so little room and in some corners three different “flow” directions converge. One has to find ways of fitting in all those different brackets and bricks with studs on sides.
After that was done and I had arrived at a satisfying look the model rested in a box half-finished for quite a while. During this time I dabbled on and off with the aft section to which later the tentacles would be attached. In the process I must have started over and rebuild this segment at least five times, optimizing the various sub-steps over and over.

All eight Tentacles fanned out

Top View, notice the Shape and Volume of the Mantle
The point here is that the eight ball joints for the tentacles needed to be placed in a very specific way. They had to be far enough apart to accommodate the tentacles themselves, yet close enough to keep the body section compact and small to match the mantle’s scale. Additionally I also wanted to retain some semblance of the attachments being placed in a circle.
All of this made this quite complicated, even more so as later this little part would have to be solid enough to not fall apart when the tentacles were attached and exerted their force. In the end I opted for an alternating placement of the square ball joint plates with the longer bar and the regular short versions. This would also come in handy since it allowed for some overlap of the tentacles without them getting canted.

Tentacle Side View

Tentacle Top View
Compared to all that, the tentacles themselves were more or less a walk in the park as their construction is pretty obvious in the first place. Once you have decided on the length and number of the individual elements it’s merely a matter of building the segments eight times each and clicking them together. A bit repetitive, but perfectly manageable. In the interest of easy modifications I kept the design quite generic and the tentacles are interchangeable for different positions. There’s a million ways to handle this, so you could naturally also build your completely own interpretation, vary the overall lengths or build specific versions for each attachment point.
Mission accomplished?
The measure of how well I may have achieved my own goals depends on a few factors.
First, the re-usage factor of pieces from the original Deep Sea Creatures (31088) sets can be anywhere from around 60 percent up to 90 percent. I wanted my model to look “nice”, so I did quite a few color swaps/ replacements by digging into my parts repository and this value is therefore inevitably on the lower end. In particular I shunned all the red pieces from the original sets, if they would be visible. If you can live with that, the number will go up.
Tentacles partially curled up to illustrate Poseability
The same goes for compromising on some structural parts like the ball joints. Unfortunately the sets only contain so many of them and they are not always in the right orientation. Unless you seriously spend at least a bit of money on additional such parts you could swap out some of them with the regular hinge joints at the cost of reduced stability and limited posing options. Good candidates for this would be the tips of the tentacles where the loads and forces aren’t that extreme.

Rear View with open Tentacles (Attack Posture)
The previous point also extends to the overall realism. A good chunk of parts is genuinely consumed by just the tentacles. As it turned out at the length I built them the pieces from the set didn’t suffice in quantity and I had to complement them with additional ones. The more you shorten the arms and use fewer segments, the closer you get to not having to rely on extra stuff. This is entirely up to you.
Though generally I’m of the opinion that the length of the arms is often totally underestimated and misrepresented, there’s no denying that different sub-species of octopi have different lengths. As a general rule you can say the smaller the creature, the shorter the tentacles. This includes infantile and adolescent specimen not yet having fully formed tentacles, but also small variants like the poisonous blue-ringed octopuses appearing more stubby to begin with.

Rear View Beak Detail
With all those optimizations you can trim down the overall parts count from above 600 pieces to 400 and below. You can take this even further and only use six tentacles if you want to match it up with the squid, though then you may require quite some reworking of the aft head section. In any case, anything is possible and more than anything else I consider my model one possible approach and solution with lots of room left for alternatives. In fact even now I’m considering options on how to improve this further.
Instructions are coming?!
From the start I planned to create instructions for this little critter, but as a matter of fact I haven’t even started yet. Given that I built the model physically, I have to go back, disassemble it and back-trace what I actually did at each step. That’s gonna take some time, so bear with me and check back in a few weeks. In the meantime you can always support my efforts by ticking a few items off my wishlist as encouragement and motivation. Lately I’ve had this weird image in my head how the octopus would look hugging the ship in the bottle or something like that, for instance. 😉
